How to Create Forms In popup In Flutter??
Form Widget is a very important component in flutter application development. When a user creates a form, we have to implement Form validation, Form submission, etc. So in this article, we will go through how to Create Forms in popup in Flutter. Are you ready for the same?? Let us start with the learning.
How to Create Forms In popup In Flutter??
Here you go! showDialog takes a WidgetBuilder as a parameter so you can return any widget.
import 'package:flutter/material.dart';

void main() {
  runApp(new MaterialApp(home: new MyApp()));
}

class MyApp extends StatefulWidget {
  @override
  _MyAppState createState() => _MyAppState();
}

class _MyAppState extends State {
  final _formKey = GlobalKey();

  @override
  Widget build(BuildContext context) {
    return Scaffold(
      appBar: AppBar(
        title: Text("Flutter"),
      ),
      body: Center(
        child: ElevatedButton(
          onPressed: () {
            showDialog(
                context: context,
                builder: (BuildContext context) {
                  return AlertDialog(
                    content: Stack(
                      overflow: Overflow.visible,
                      children: [
                        Positioned(
                          right: -40.0,
                          top: -40.0,
                          child: InkResponse(
                            onTap: () {
                              Navigator.of(context).pop();
                            },
                            child: CircleAvatar(
                              child: Icon(Icons.close),
                              backgroundColor: Colors.red,
                            ),
                          ),
                        ),
                        Form(
                          key: _formKey,
                          child: Column(
                            mainAxisSize: MainAxisSize.min,
                            children: [
                              Padding(
                                padding: EdgeInsets.all(8.0),
                                child: TextFormField(),
                              ),
                              Padding(
                                padding: EdgeInsets.all(8.0),
                                child: TextFormField(),
                              ),
                              Padding(
                                padding: const EdgeInsets.all(8.0),
                                child: RaisedButton(
                                  child: Text("Submitß"),
                                  onPressed: () {
                                    if (_formKey.currentState.validate()) {
                                      _formKey.currentState.save();
                                    }
                                  },
                                ),
                              )
                            ],
                          ),
                        ),
                      ],
                    ),
                  );
                });
          },
          child: Text("Open Popup"),
        ),
      ),
    );
  }
}
Side note: Using the rflutter_alert plugin
You must add the library as a dependency to your project like the below one.
dependencies:
  rflutter_alert: ^1.0.3
To open a popup, function and do the following:
_openPopup(context) {
   Alert(
       context: context,
       title: "LOGIN",
       content: Column(
         children: <Widget>[
           TextField(
             decoration: InputDecoration(
               icon: Icon(Icons.account_circle),
               labelText: 'Username',
             ),
           ),
           TextField(
             obscureText: true,
             decoration: InputDecoration(
               icon: Icon(Icons.lock),
               labelText: 'Password',
             ),
           ),
         ],
       ),
       buttons: [
         DialogButton(
           onPressed: () => Navigator.pop(context),
           child: Text(
             "LOGIN",
             style: TextStyle(color: Colors.white, fontSize: 20),
           ),
         )
       ]).show();
 }
And call it this way as shown below
onPressed: () {
  _openPopup(context),
}
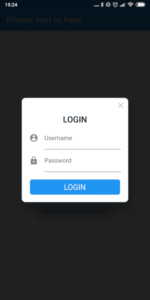
We will get output like as shown in the below image:
The complete code snippet will look like the below:
ElevatedButton(
          child: Text("Open Popup"),
          onPressed: () {
            showDialog(
                context: context,
                builder: (BuildContext context) {
                  return AlertDialog(
                    scrollable: true,
                    title: Text('Login'),
                    content: Padding(
                      padding: const EdgeInsets.all(8.0),
                      child: Form(
                        child: Column(
                          children: [
                            TextFormField(
                              decoration: InputDecoration(
                                labelText: 'Name',
                                icon: Icon(Icons.account_box),
                              ),
                            ),
                            TextFormField(
                              decoration: InputDecoration(
                                labelText: 'Email',
                                icon: Icon(Icons.email),
                              ),
                            ),
                            TextFormField(
                              decoration: InputDecoration(
                                labelText: 'Message',
                                icon: Icon(Icons.message ),
                              ),
                            ),
                          ],
                        ),
                      ),
                    ),
                     actions: [
                      RaisedButton(
                          child: Text("Submit"),
                          onPressed: () {
                            // your code
                          })
                    ],
                  );
                });
          },
        ),
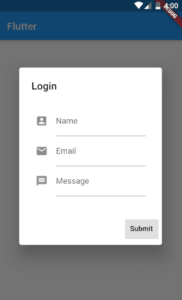
The output will look like the below:
Conclusion:
Thanks for being with us on a Flutter Journey !!! Lots of amazing content coming up your way!! Stay Tuned!!
Tell us what methods you have used in the past for these problems!!
So in this article, we have been through How to Create Forms in popup in Flutter.
Also, If you still have doubts about Flutter Development !!! Just let us know, We would love to assist you.
Keep Learning !!! Keep Fluttering !!! Stay Connected !!!
Don’t forget to leave your valuable feedback in the comments!!! It keeps the enthusiasm going.
Flutter Agency is our portal Platform dedicated to Flutter Technology and Flutter Developers. The portal is full of cool resources from Flutter like Flutter Widget Guide, Flutter Projects, Code libs and etc.
Contemporary ventures
Recent blog
ready to get started?
Fill out the form below and we will be in touch soon!
"*" indicates required fields

